No products in the cart.


Description
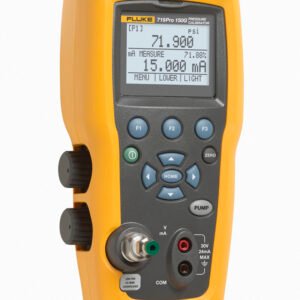
The 719Pro includes a full functioning loop calibrator that sources, simulates and measures mA signals and more making it the ideal test tool for calibrating high accuracy transmitters, pressure switches and pressure gauges.
Get the ultimate in measurement flexibility with the large backlit screen, which displays three parameters at once:
- Pressure measurement from internal or external sensor
- Sourced/simulated or measured mA values
- Temperature measured by optional RTD probe

| Product Features | |
| Item | Description |
| 1 | Power button. Turns on and off the Product. |
| 2 | Three function buttons. Used to configure the Product. These buttons correspond to messages on the display. |
| 3 | Zero button. Zeros pressure measurements. |
| 4 | Arrow buttons. Controls mA source/sim. and sets pump and % error limits |
| 5 | Pump button. Runs the electric pump. |
| 6 | Home button. Returns to the main menu screen. |
| 7 | Pressure vernier adjust knob |
| 8 | Pressure source or measurement connector |
| 9 | Input terminals to measure current, volts and contact closure for switch test. |
| 10 | External pressure module connector |
| 11 | RTD probe connector |
| 12 | Pressure/Vacuum Selector |
| 13 | Vent |
| 14 | Firmware programming connector (for factory use only) |
| 15 | Pump clean-out valve |
| 16 | Battery door |
Initial Setup and Basic Pressure Generation The Product is supplied with a special low-volume calibration hose kit for faster pumping to pressure and quick pressure stabilization. The necessary “quick-fit” hose connectors and BSP adapter for non-NPT applications are also included. Fluke recommends that this type of hose be used to get the best performance from the Product. When the fittings are installed and the Product is connected to the unit under test (UUT), the Product is ready.
- Before pressure is generated, make sure the Product is configured for the application. If necessary, review the “Calibrator Interface” section to select the correct configuration.
- Make sure that the pressure vacuum knob is set for the correct function (+ for pressure and – for vacuum).
- Close the vent knob.
- Push the pump key and see the pressure (or vacuum) increase until the necessary pressure is reached.
Note
The pump motor speed will start slowly when pressure is low (<15 psi) for better control at low pressures. - Use the fine adjustment vernier to fine tune the pressure/vacuum indication as necessary.
- To fully decrease or bleed off the pressure, slowly turn the vent knob to the open position. When this is done carefully, the pressure-bleed rate can be carefully controlled and this helps when taking down- scale pressure readings.

Pump Connection
Electric Pump Considerations
The Product uses a small, battery-powered pneumatic pump that can quickly build rated high pressure. Because the pump has an upper pressure generation limit, there may be atmospheric conditions where it cannot go to full- scale pressure. High-altitude use (about 3000 ft or 1000 meters), or use at cold temperatures, can limit the pump to about 90 % of its rated pressure. In these cases, the vernier adjustment can be used to supply additional pressure necessary if full-scale pressure must be supplied.
In these situations, start the calibration with the vernier in the full counter-clockwise position and then, when the electric pump reaches its limit, turn the vernier clockwise. This will raise the pressure to set the necessary reading.
Measure Pressure
To measure pressure, connect the Product with the correct fitting. Select a pressure setting for the display that is used. The Product has one internal sensor and many optional external sensors (EPMs) are available. Make sure to choose the sensor based on working pressures and accuracy. Warning
To prevent personal injury:
- Pressure sensors can be damaged and/or personnel injury can occur due to improper application of pressure. Refer to Table 9 for information on overpressure and burst pressure ratings. Vacuum should not be applied to any gauge pressure sensor. The Product display shows “OL” when an inappropriate pressure is applied. If “OL” is shown on any pressure display, the pressure should be reduced or vented immediately to prevent Product damage or possible personnel injury. “OL” is shown when the pressure exceeds 110 % of the nominal range of the sensor or when a vacuum in excess of 2 PSI is applied on gauge range sensors.
- Push
![Fluke_719PRO_zero]() to zero the pressure sensor when vented to atmospheric pressure.
to zero the pressure sensor when vented to atmospheric pressure.
 to zero the pressure sensor when vented to atmospheric pressure.
Note
To ensure accuracy of the Product, the Product must be zeroed before a device is calibrated. See the “Zero Function Use” section.
To ensure accuracy of the Product, the Product must be zeroed before a device is calibrated. See the “Zero Function Use” section.
Media Compatibility
The Product has a unique user-accessible valve cleaning port for easy pump service. See the “Clean the Valve Assembly” section for how to clean these valves. Make sure to only expose the Product to clean, dry gases.
Measure Pressure with External Modules
The Product has a digital interface to be used with external pressure modules. These modules are available in different ranges and types that include gauge, vacuum, differential, and absolute. Connect the modules to the interface and select [EXT] (external sensor). Since the interface between the Product and the module is digital, all accuracy and display resolution is derived from the module.

Pressure with External Modules
Measure and Generate Current (4 mA to 20 mA)
Use the input terminals on the front of the Product to measure current:
- Select the mA function on the lower display and select MEASURE. Current is measured in mA and percentage of range. The range on the Product is set to 0 % at 4 mA and 100 % at 20 mA.
For example:
If the current measured is shown as 75 % then the mA value is 16 mA.
Note
The display shows “OL” when the measured current is more than the nominal range of current measurement (24 mA).
- To source current, the same connections are used. From the configuration screen, select mA source or mA Sim-2W.
- This function will only work on the LOWER screen. In the source mode, the Product supplies 0 mA to 24 mA with its own internal 24-volt supply, whereas in the simulate mode the Product acts as a two-wire transmitter and an external 24-volt supply is necessary.
- Push any of the arrow softkeys to start the output mode and use the arrow softkeys to adjust the mA output. The function keys can also be used to step the output in either 25 % steps (4, 8, 12, 16, 20 mA) or 0 % (4 mA) and 100 % (20 mA). While in the mA output mode, if the loop is opened or the compliance is exceeded the display flashes “OL”.

Measure and Generate Current
Measure Voltage
To measure voltage, use the input terminals on the front of the Product. Select the volts function on one of the displays. The Product can measure a maximum of 30 V dc.
Note
The display shows “OL” when the measured voltage is more than the nominal range of the voltage measurement (30 V).

Voltage Measurement
Measure Temperature with an RTD
To measure temperature with an RTD probe, select the RTD function on one of the displays. Make sure the correct probe type is selected. See the “Set the RTD Probe Type” section.
The standard probe has a 10-inch insertion depth with a ¼-inch diameter stainless steel sheath.
Note
The factory default type is PT100-385 so if the Product is used with the Fluke 720 RTD Probe (pn 4366669), it is not necessary to set the probe type. Connect the probe to the Product and configure the display to read temperature.
The display shows “OL” when the measured temperature is outside the nominal measurement range of the RTD function (below -40 °C or above 150 °C). If a custom probe is used, enter the R0 and coefficients with the serial interface.

Temperature Measurement with RTD Probe
Connect a pressure switch to the Product

To do a pressure switch test:
- Change the setup to Setup 4 (default switch test) listed under “Setups” in the MORE configuration menu choices. The upper display is set to [P1] ST, all other displays are off.
Note
The pressure switch test can be done with these functions: [P1] ST, or EXT ST. Use low-volume tubing when possible.
- Connect the Product to the switch with the pressure switch terminals to the pressure switch contacts (de- energized dry contacts). The polarity of the terminals does not matter. Connect the pump from the Product to the input of the pressure switch.
- Make sure the vent on the pump is open.
- Zero the Product if necessary.
- Close the vent after the Product is zeroed. If a normally closed switch, the top of the display shows “CLOSE”.
- Apply pressure with the pump slowly until the switch opens.
Note
In switch-test mode the display update rate is increased to help capture pressure input changes. Even with this enhanced sample rate, pressurization of the device under test should be done slowly to ensure accurate readings.
- When the switch is open, “OPEN” is shown on the display. Bleed the pump slowly until the pressure switch closes.

Typical Remote Connection
Process / Calibration/Pressure Calibration/Pressure Calibrators Template | |
|---|---|
| Max Pressure | 300 psi (300 hPa) |
| Accuracy | ± 0.025 % of full scale, 6 months ± 0.035 % of full scale, 1 year Dry Air and non-corrosive gas only |
| Min/Max | Yes |
| Backlight | No |
| Source/Simulate DC Current | Yes |
| Measure DC Current | Yes |
Product General Attributes | |
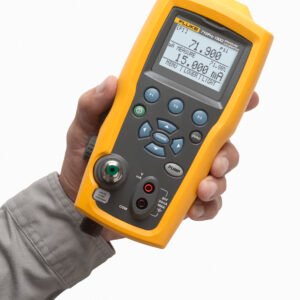
| Unique Features | Unique integrated electric pump for one handed pressure calibration Test pressure switches easily with easy-to-use switch test function Precision pressure adjust vernier for easy and accurate pressure calibration Ideal accuracy and performance (0.025 %) for reference class transmitter calibration 300 PSI pressure range |
| Warranty | 1 YEARS |
| Product Weight | 4.74 LBS |
| Product Height | 7.87 IN |
| Product Length | 16.14 IN |
| Product Width | 11.02 IN |
| Data Logging | No |
| Battery Type | AA |
| Power Supply Voltage | Battery Powered |
| Country of Origin | China |
| UPC | 95969673815 |
You must be logged in to post a review.
Manuals/Guides
BrochuresManuals
- Fluke 719PRO Pressure Calibrator - Calibration Manual
- Fluke 719PRO Pressure Calibrator Quick Reference Guide
- Fluke 719PRO Pressure Calibrator User's Manual
- Fluke 719PRO Quick Reference Guide
| Weight | 4.74 lbs |
|---|---|
| Dimensions | 16.14 × 11.02 × 7.87 in |
Related products

Sale

Fluke 725Ex – Process Calibrator, Intrinsically Safe, Multi-Function
Original price was: $6,929.98.$4.40Current price is: $4.40. Add to cart


 Fluke 719PRO 300G Electric Pre...
 $5,595.68
Our team of knowledgeable professionals is here to help you make informed decisions. Whether you need product recommendations, technical support, or guidance on your purchase, we're just a click away.
Contact Us Now:
📧 sales@nestesinstruments.com
📞 +1 (833) 763-7837
Let us assist you in finding the perfect solution!
Contact Us Now:
📧 sales@nestesinstruments.com
📞 +1 (833) 763-7837
Let us assist you in finding the perfect solution!
Reviews
There are no reviews yet.